At the beginning of March I announced a major change in the way I presented my Fine Art Prints for sale. You can find more about that announcement from the Brand New Fine Art Gicleé Print Options Blog post. Part of that announcement was that all my prints will now come Matted, affording my customers the opportunity to simply place the print directly in an off-the-shelf Frame. I devoted a recent blog post to the process I take in Matting my Fine Art Prints should you wish to know more.
Over the last several years I’ve helped a lot of customers choose the right Fine Art Print to match their needs. One request that has increased over time has been to supply my Fine Art Photographic Prints Framed. While I am always happy to provide this service for a customer I realised I needed to start offering a Framed Option directly from this site. And to that ends I announced as part of my new Print Offers customers are now able to choose between a Matted Print or Framed Print directly from their shopping cart.
Like I did last week with my 5 Steps to Matting Fine Art Prints today I wanted to step you through how I Frame those Matted Prints. Like my approach to Matting my artwork I take equal care in Framing each piece to ensure it is perfect before it is shipped of to it’s new owner.
This is pretty much a repeat of step one in my Matting Fine Art Prints blog post because the tenants hold true. A clean workspace is critical to ensure no dust or dirt reaches the print or glass; or worse gets sandwiched between the two during the framing process. Framing the Matted Print should be carried out swiftly and ensure the print is not left exposed to the elements.
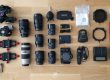
So to ensure a swift Framing process I make sure I have both plenty of room and everything I’ll need to Frame the Matted Print near to hand (and nothing more). On the right you can see a complete list of the materials I use during the Framing process and I shall refer to each of these as I work through each step.
Real solid wood frame, finished in a dark brown colour
2mm Optical glass
MDF Backing board
85gsm Heavy-weight Kraft Paper
Scotch ATG 700 Tape Gun and double-sided tape
Kraft Brown Paper Backing Tape
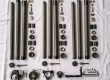
Zinc Plated, Flange Head Screws for D-Rings
Zinc plated D-Rings
Stainless Soft-Coated Hanging Wire
Cork Frame Bumpers
Seal of Authenticity
First step is to make absolutely sure the Glass (2) is spotless with zero smudges, marks, dust, etc. I use a Glass Cleaner Mixture I make myself of 50/50 isopropyl alcohol & distilled water and lightly mist it on to one glass surface at a time; gently wiping with a micro-fibre cloth. The alcohol mixture evaporates very quickly leaving no residue. This mixture is also safe to use in an Archival environment. I give the Matted Print and Glass one last check for any dust and if needed give them both a quick brush using a soft drafting brush to lift any dust. Lastly I quickly slip the glass over the Matte which I then slip both over the backing board (2) to make a sandwich and ensure a tight seal. I use my trusty cotton gloves anytime I need to touch the glass to make sure I don’t introduce any amudges.


Next step is to place the frame (1) over the Glass, Matte & backing board sandwich. I again double checked to make sure no dust has crept in. Then gripping the back of the backing board tight to the frame I’ll flip the frame. The backing board is secured in place with brads, bent to hold the Glass, Matte & Backing Board all tight against the front lip of the frame. Once secure its time to seal it up. I use a specialist Kraft Paper Backing tape (6) to tape around the edges of the frame and then fold each side down and stick to the backing board to create a tight dust free seal.


Next up is the paper backing. I use a heavy-weight brown Kraft Paper (4) for all my frame backs. Placing the frame on a sheet I roughly cut the paper to size. Putting the paper aside I flip the frame on its back once more and using a Scotch ATG Gun (5) I tape the very edges of the frame around all sides. The great thing about this ATG double-sided tape is it is so workable. I quickly run my finger along the edges of the frame and roll in any tape that is sticking out beyond the edge of the frame. Once complete it is time to flip the frame again and lay it down on the Kraft paper. With some light pressure I ensure an initial adhesion and then once more flip the frame on its back. I’ll then run my finger along the edges to ensure firm adhesion all the way around. Then using my trusty steal ruler and craft knife I cut off the access paper so it runs tight to the frame edges but not beyond.


And here we are, last step; preparing the Art for hanging. First thing is to mark a location on the frame on both sides 1/3 down from the top. Once marked I use a bradol to put a pilot hole for each screw. Then I screw (7) the D-Ring (8) to each side. Bonus Tip: It is advisable to double check the orientation of the print in the frame before you start putting holes in your frame. Last thing you want after sealing your frame up is to discover you’ve added the hangers upside down. Next up is the fit the wire. I use a Soft Coated high tensile wire (9) that is capable of handling at least double the weight of the framed artwork. Cutting a length a few inches longer then the length of the frame I then tie it off to one D-Ring then thread it through the second, pull tight (not too tight) and tie it off. Last up is to fit the cork bumpers (10) at the bottom edges of the frame. These help to both protect my customers paintwork, wallpaper, etc and will help level off the print when hung.


Just like every one of my Matted prints all my Framed prints are also finished off by affixing my unique Seal of Authenticity (11). This Seal denotes that the Artwork was Framed by me. This gives my customers peace of mind that the print is an original piece directly from me. It also allows me to offer my 4 unique warranties.